techtipsguidelines: Tutorials

TechTipsGuidelines

Post Top Ad

Showing posts with label Tutorials. Show all posts

Saturday, August 4, 2018

How to Resume Internet Download Manager Expired and Broken Download

3:14 AM 0
IDM(Internet download manager) is a popular download management utility which is world's fastest downloading tool.It accelerate your downloading speed upto 5 times.It is an excellent to use your internet efficiently,that it use your internet connection's speed up to maximum and also provides control over your files.You have control over pausing,resuming,schedule and you can resume downloading files even from unexpected power loss and network problems.
Idm has simple graphical user interface that makes it easy to use for both beginners and professionals.


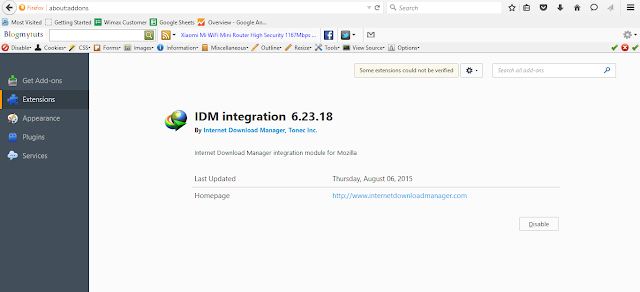
Before doing Step below make sure your browser has  IDM Integration Extension and updated.


Download Latest IDM Here :


You can learn How To Resume Broken and Expired Downloads through below steps.


 This trick is in build in internet download manager.You have do the following

1.)    Open Internet Download Manager and Right click on the broken file
    Select Refresh Download Address.


2.)    A new window will open and on your browser will redirect to the download location.  " IDM is waiting for new address" 

    After getting the download link address click on OK or YES to start.

3.)  You can now resume your download...  It Resumes your Download..  


Note:This trick is doesn't work in all occasion. So i prefer you to choose the method 2


 This works than method 1.This can done in two ways and method 2 has two sub sections.


1.)    Open your Internet Download Manager and right click on the download file.click on properties.

Copy the address in the Referer field and paste it in your browser. 


2.)    Then click to download it.Then in IDM's dialog window click on download later.


3.) Then goto IDM Dashboard and get new address by clicking its properties, copy the address in address field.


4.)    Paste the new address in broken file's address field.


 5.)   Now click resume to continue your file downloading.


Read More

How To Turn On an Offline Computer With Android Free Wake-On-LAN Apps

3:11 AM 0
You can turn on an offline computer with Android Phone via Free Wake-on-LAN Apps.

In this tutorial I teach you how to configure the free Android application WOL, boot your computers from afar by pushing the command from your phone to your home network.

This way, you can control an offline computer remotely by waking it up before you establish a connection.

NOTE: 
For WoW (Wake On Wan), just set the broadcast address to be the remote IP address of the device. This may require some extra setup on the remote network to make sure that the wakeup packets actually arrive on the remote device.

If you're trying to wake up a device that is connected via WiFi it may not work, there's not many WiFi cards that support the WOL standard. WOL works best via an ethernet connection. Some devices such as laptops may not support WOL very well or at all. Some might only work when they are in sleep mode, and others might allow you to turn it on when it is powered off. 

Search any Free "Wake on Lan" on Google Play Store. 


sample: WAKE ON LAN Apps by Mike Webb

If you can answer the following questions with "Yes", this is the appropriate method:
  1.     Is the target computer located in a network?
  2.     Is the target computer connected to the network using a network cable?
  3.     Is the target computer connected to the Internet via a router?
  4.     Does the router support port forwarding or port mapping?
  5.     Does the router have a public address? a fixed IP address or an public domain address
  6.     Does TeamViewer run with the operating system on the target computer (auto boot)?

If yes to all of the above, the following steps are necessary to use Wake-on-LAN via a public address:


1.Configure the hardware of the target computer

a.) Enable WOL on your computer Bios Power Management this might allow you even the power is off . BUT Even you can not find this on your Bios (sample Laptop) step b will work on sleep mode only.

b) Enable Wake up on LAN on your OS  (Device Manager) Select your LAN Card ( Ethernet Controller ) or WiFi Adapter (Note some WiFi don't support WOW wake up on WAN).  Go to Power Management check all the box magic packet etc.

c) Get your LAN or WLAN Device Info   IP Address and MAC Address , you can find that at your Network Sharing then  Network Connection right click go to properties click device info ( Details)
Sample here:
LAN MAC Address: 78:2B:CB:E0:C8:DF
LAN IP Address: 192.168.254.110


2.Configure the Router/Modem
Set Port Forwarding  on your Router/ Modem

Here I use Wimax Modem -there is No Port Forwarding,  but  Port Mapping is Okey for Local WAKE ON LAN.

  • Set Mapping Name : any you want
  • Set External and Internal Port : 9
  • Protocol set Both UDP/TCP
  • Internal Host : Your Computer Static IP ( You can add as many as you have)


3. Configure your  Android WOL Apps on the target computer.
Open your Apps  Search or Add Manually:
  • Device Name
  • MAC Address
  • IP Address
  • Port 9 ( this is set by default)


 4. Wake up the target computer

Finally Press Wake! If you do all the steps above right, your computer will awake with  your android device remotely.


Note: Expert knowledge is recommended to configure Wake-on-LAN via a public address. The configuration process may differ substantially depending on the hardware used. It is also helpful, if you have some experience with the configuration of routers and networks.

Extra Tips: You can use remote PC too on this trick like TeamViewer that has Wake On Lan function.
Read More

How to make a bootable Kali Linux 2.0 USB with persistence that save files

3:10 AM 0
How to make a bootable Kali Linux 2.0 USB with persistence. Persistence means that all the data changes that take place while you are using the system, they will be saved on the usb / pendrive that you Linux is in.


Reasons for using Live USB with Persistence are:

  • · You use all of your system resources eg. CPU, RAM, GPU, etc
  • · You take no space of your Hard Drive for it.
  • · You can take your OS to any PC you use.

Requirements:

1. Universal USB Installer : www.pendrivelinux.com/universal-usb-inst­aller-easy-as-1-2-3/


or Rufus Faster bootable maker : https://rufus.akeo.ie/


2. Kali Linux Image : https://www.kali.org/downloads/

3. MiniTool Partition Wizard : www.partitionwizard.com  

OR http://download.cnet.com/MiniTool-Partition-Wizard-Free-Edition/3000-2094_4-10962200.html

 OK  LET'S START...


1. DOWNLOAD KALI LINUX ISO AND MAKE A BOOTABLE LIVE KALI


 3. CREATE 2 PARTITION WITH MINI TOOL

1. Select your USB drive with Kali Linux  right click  and choose  Move/Resize
  I resize mind 3.2 gig


2. Click the Unallocated rigth click to create new partition.


3. Name the partition label  "persistence" , create as "primary" , file system "Ext4" , cluster size "default" .


4. Click "Apply"  check .. and then click Yes.


Wait 10 minutes or more...


4. BOOT FROM YOUR NEW KALI LINUX LIVE USB PERSISTENCE
OPEN THE TERMINAL (CMD LIKE)


Commands Used In Kali :


UUI is the drive name change with your own drive name label

1. fdisk -l : To List Your Drives

2. mkdir -p /mnt/UUI : Make a directory on the filesystem to mount your USB

3. mount /dev/sdb2 /mnt/UUI : Mount the partition on the directory you made

4. echo "/ union"> /mnt/UUI/persistence.conf : Adds a configuration file to enable persistence.

5. umount /dev/sdb2 && reboot : Unmount the partition and reboot.


OK DONE!!..

When Kali as password type : toor
user name is : root 


Read More

Post Top Ad

ADBLOCKER DETECTED
It looks like you're using an ad blocker. That's okay. Who doesn't?
But without advertising-income, we can't keep making this site awesome.
Please disable your ad blocker and then reload the page to continue enjoying our site.
Reload Page
Powered By - techtipsguidelines